A few students experienced some confusion over using a virtualenv this week. Let’s review:
“virtualenv is a tool to create isolated Python environments. virtualenv creates a folder which contains all the necessary executables to use the packages that a Python project would need.” (source)
You can think of it as a quarantine space: It is completely sealed off from the rest of your computer. When a virtualenv is activated, and you install things in it, those things are NOT AVAILABLE outside. When you are not IN that virtualenv, you cannot access those things (such as BeautifulSoup).
When we created our two separate, different virtualenvs in class (on different days), we installed different things in the two. So you have ONE virtualenv that is for scraping, and it contains the BeautifulSoup library. You have ANOTHER virtualenv — in another folder — that contains the Flask framework and its many dependencies.
Here is how we set up our two virtualenvs in class:
- We created a new folder for that set of projects.
- We cd’d into the new folder, using Terminal.
- While inside the folder, we entered this long command on one line:
virtualenv --python=/Users/username/Software/Python-3.6.0/mybuild/bin/python3 env
(In place of “username,” you typed your own username for your own laptop.)
That command created a new virtualenv running Python 3 (not 2). The long path in the long command refers to the exact Mac OS location where we installed Python 3. If you’re on Windows, or if you never did a safe Python 3 install on a Mac, you don’t have that. There are instructions for Windows at the end of this document (pages 5–6).
Note that by activating a virtualenv that was set up in this way, you are automatically running Python 3 (not 2) for all the things.
If you had wanted to create a Python 2 (not 3) virtualenv on a Mac, you could instead just type this:
virtualenv env
Note that in both cases, the command creates a new folder named env inside the folder you are currently in. If you wanted it to be named foobar, you would type: virtualenv foobar
For that reason, you must go inside the project folder before you activate the virtualenv with this command (it is different for Windows):
source env/bin/activate
Don’t go inside the env folder.
(If your folder was foobar instead of env, the command would be source foobar/bin/activate)
While the virtualenv is activated, you’ll see (env) at the left side of your Terminal prompt. While you see that, you have access to everything you installed in that virtualenv.
To install new Python packages, libraries, frameworks, etc., for the project, make sure the virtualenv is activated. This is what makes the “quarantine space” work: You are installing all the new things within the enclosed, sequestered space, and they will not affect anything on the rest of your system. That is the beauty of the virtualenv.
When you’re finished working, you can close down the virtualenv with one command:
deactivate
My practice for handing projects, or a set of projects, is to create a new folder and name it something broad, like scraping (for all my web scraping projects). Then I go inside scraping, create a new virtualenv there, named env, and install what I need to do scraping projects — such as BeautifulSoup. For each scraping project, I create a new folder inside scraping and name the new one something that matches the project — such as soccer-players, for example.
When I wanted to start making some Flask projects, I created a new folder — outside scraping, because this is no longer about scraping work — and created a new virtualenv there, named env. I activated the virtualenv and then installed what I need to do Flask projects.
Other methods to create a virtualenv
Other people use their own systems to make virtualenvs. Some people always name theirs venv instead of env. Some people name their virtualenv after their project (for example, soccer-players), which confused me very, very horribly when I was starting to learn about virtualenvs.
I mention this because you will no doubt see tutorials where people use these other systems or methods. They all work — but YOU have to know what YOU’RE doing. YOU have to keep track of what you named your folder, your virtualenv, your project, etc.
In our class, I stick to my one way of creating a new virtualenv because it seems clear and simple to me. I didn’t get the hang of it right away, but now it seems quite natural to me. It’s consistent, and it keeps all my projects well organized.
Demonstration
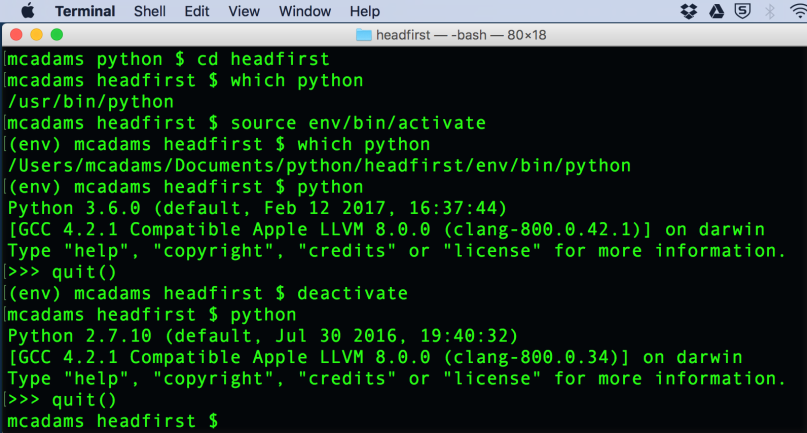
Above, I used a series of commands in Terminal to demonstrate that I am running Python 3.6.0 while I am in my virtualenv inside a directory named headfirst. When the virtualenv is deactivated, I am running Python 2.7.10.
